Beauty crafted in the dark chambers of the heart


Showing posts with label fx makeup. Show all posts

Wednesday, September 30, 2015

Let Us Burn

Hi! As promised, today's post is about a Halloween look I created to suit the Sharon Den Adel makeup look. Lately, to get some inspiration for Halloween, I've been watching a lot of Youtube videos and I came across a couple ideas that really sparked something in my brain.

I watched two videos about dragons and SFX makeup around the dragon theme and, after organizing ideas in my mind, I came up with the idea of doing a ripped skin look.

The idea was to create some sort of hybrid between a human and a dragon and I decided to do this by creating a sculpted piece that looked like dragon skin and scales and then using that as the skin underneath the ripped piece.

The reason why I chose to do a dragon is because Within Temptation's most recent album, Hydra, has two dragons in the cover.


Products used:

Clay
Liquid Latex
Cotton pads
Cream face paints in red, orange, yellow and black (I used oil based)
Golden pigment
Foundation

This list of products is very vague and not specific because you can really use anything you have at home. I used liquid latex because I haven't gotten around buying a silicon compound or scar wax.
Make it as realistic as you want.
When sculpting the dragon skin (if you're doing it that way) keep in mind that the mold would sort of fill the negative space of what you sculpted, so keep in mind what's over what and how it will look in the end.

The colour scheme is something you can tweak and twist to fit your preferences, I chose reds and oranges because I wanted to follow the Let Us Burn theme.

So that's it for this post, I want to give a major thank you to Rita for taking photos, sharing ideas and giving opinions during the process of making this look happen.

If you want a more in depth idea of how to recreate this, watch this video.

Love,
Anna

Saturday, May 16, 2015

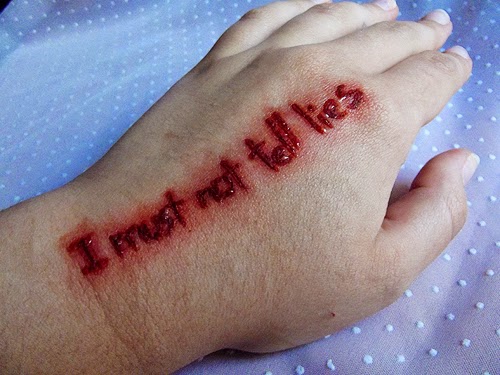
I must not tell lies, Professor Dolores Umbridge

Hi! Today I have a Harry Potter inspired post for you. I was scrolling down Powdah's Instagram page, who is an amazing FX makeup artist, and I got inspired to do something in that area but I did not know what to do so I decided to do something simple that actually turned out pretty hard to get done.

After being "forced" to watch all Harry Potter movies, I started being a bit more keen on it and so this is dedicated to the one person that made me watch the movies.


I did this with liquid latex, cream paints, homemade stage blood and very small detailing brushes.

First I put down an orange base with the shape of the letters I wanted to create to serve as my guide lies. Then I applied two layers of liquid latex, one smooth and the second one I tried to leave it a bit messier to achieve the jagged effect of wounds.
Afterwards I went over with a very fine brush with a large rage of blood and bruise colours such as reds, pinks, oranges and blacks, blending a bit of a pinkish red color outside the limits of the cuts.
To finish it off I applied tinny drops of blood in certain parts of the letters until I was pleased with the result and this is it!
It took me about an hour to get done.


So this is it for this Saturday's post, I hope you have enjoyed it!

Love,
Anna

Wednesday, May 13, 2015

Time Is Just a Concept and Always the First Thing to Fade

Hello again! I'm really excited about this week's post!
I was asked by my good friend Marisa, who's been here on the blog before, to do special effects makeup and hair for a short film she's making for school. I won't get too much into the story line but I'll show you the backstage of this scene. I was asked to create an old "mask" for Miguel to look aged and, precisely, old.
I went for the more realistic FX way to do it that isn't prosthetics, liquid latex.
Since they did not have a budget, I decided that, if everyone from the group wanted to invest a little bit of money, we could end up with a very true to life thing that would do the trick for camera. 


Here's how I got this 3D wrinkled effect on Miguel's face!


After a couple of funny faces, I got around tracing the natural folds that his skin creates when he smiles or does various faces.


Then we went on to the less pleasant phase: the latex layers.
I applied about 5 to 6 thin layers of latex with a cosmetics sponge on the stretchable zones of his face.
I also applied on his forehead, which isn't as stretchable, to mimic the texture of the rest of the face so it wouldn't look ridiculous. 


Once all the latex layers were dry, I went on to shading certain wrinkles and highlighting specific areas to further age his appearance.

I particularly love this shot!!!!


I also ran some cream paint on his hair and eyebrows to finish up the look.


And this was the final result!

I think we came up with a pretty wicked result! The removal part wasn't as nice but you'll have the chance to see that on the bloopers when the short film airs.
Look forward to posts similar to this about other scenes of the short film next week as we countdown to the day the short film is released!

I hope you have enjoyed this post as much as I loved, LOVED, creating it and I will be back on the next one!

Love,
Anna

Saturday, October 25, 2014

Halloween Special: Mz. Hyde

Hello! So I'm back and this week I bring you a Halloween look.
I'm really excited about this one because it is very special. This look is inspired in a song by Halestorm called Mz. Hyde. This song is about a hidden side of Lzzy, the vocalist, a much darker and evil side.
I figured I would do this look to show the appearance of my darker side, sort of like to show what is hidden inside of me.
Turns out that this look is way more on the punk side than I anticipated, nevertheless I love how it turned out.
This is the look I'm going to do for my Halloween night only with a few changes, so I hope you enjoy it!


"Welcome to the nightmare in my head,
Say hello to something scary,
The monster in your bed,
Just give in and you won’t be sorry,
Welcome to my other side,
Hello it’s Mz. Hyde!"

Meet Mz Hyde.
I imagine Mz Hyde as a "browless" all pierced character.
I didn't, although, picture her as someone so punk but I love how it turned out!


I suppose that the hardest part about this character is the concealing of the eyebrows.
That can be considered FX makeup because it changes your face to something that is not considered "normal" or "regular".
I used a glue stick over my brows several times until I achieved a minimally smooth finish. You can find videos on how to cover your eyebrows on youtube.
I then powdered them to get rid of the stickiness of the glue. Then I would suggest using a warm concealer color to conceal the color of the brows. I used my eyeshadow primer and it worked very well.
After you have finished the rest of your makeup, you will want to use concealer in the same shade as your skin to further erase your eyebrows.

For the actual makeup I did something very simple.
I used a dark blue eyeshadow all over the lid and just a bit of black eyeshadow in the crease. After I did the eyeliner on the top lash line, extending it quite far, I brought the blue eyeshadow together with the liner, blending it in in a triangular shape.
On the bottom lash line I also drew a little flick, pointing downwards and blended some black eyeshadow, again, in a triangular shape, leaving a space between the top and bottom flicks.
On the inner corners I extended the eyeliner on the top part of the eye as well as on the bottom, leaving a blank space between where I placed a white sparkly eyeshadow.


 Under the place where my eyebrows used to be, I drew a sharp line with black eyeshadow, which I blended down just to create some shape.
On my cheeks I used a black eyeshadow to contour and a black lipstick on my lips.
I drew a line down my chin and down my neck till my chest because I wanted to give the character a bit more of a personality.
When it comes to piercings, I used little silver beads that I placed in my cheeks to make dimple piercing, in the bridge of my nose and in the center of my lip. For the septum piercing I used a silver ring. I also added some silver rings to my ears.

In the pictures it is not very visible what I did to my hair but I basically pulled it up, very tight on the sides to simulate side cuts and teased it down the center of my head to create a hawk.

The look wouldn't be complete without a leather jacket and black clothes.


punk

And the look is complete!
This is how I believe my inner darker self to be.
Apart from the song, one of my biggest inspirations for this was Nicole Greenleaf.

Little note: I would just like to thank my girlfriend for taking the photos. She's always in charge of all the photos in my looks, so thank you, babe.

That's all for this week's post, I hope you have enjoyed!
If I don't post anything before Halloween, my next post will be full of photos of my Halloween night and photos of everyone's costumes!

"There’s no way to be sure,
Which girl you’ll get to know."


Love,
Anna

Sunday, October 12, 2014

Halloween Special: Shattered

Greetings! This week I bring you a Halloween look.
"Viewer description is advised".


FX makeup has always been something that fascinates me. After watching a considerably big amount of videos and experimenting with makeup myself, I have gained a little bit of practice with FX makeup, so I decided that I would show you a little bit of what can be done with special effects makeup.

For this look, I decided to go very bloody and graphic. I had this idea in my mind last year of creating something like an iconic persona or character that had classic pin up makeup but that was corrupted in some way. Last year I used this idea and corrupted the character with a shot in the head. This year I decided to use "glass" stuck to the face to corrupt my character.

The makeup itself was pretty easy, just a classic pin up look. Dramatic eyeliner and red lips will do the trick.
For the wounds you can use a variety of different materials to achieve the same result.

To create the texture of the ripped or pulled skin you can use liquid latex, neutral gelatin, 3rd Degree, which is a silicon compound, or molding wax. I used liquid latex as it is pretty inexpensive and you can find it in any art supply store you may have near you. If you cannot find liquid latex, neutral gelatin is even less expensive and you can find at the supermarket.
After I placed the liquid latex in the desired places, I waited for it to dry and once it set, I used scissors to rip through it to create that jagged effect on the skin.
For the next step you may want to visit an Halloween store and buy some face paint, since that's the least expensive alternative. 
Face paint is easy to find and not expensive at all but I personally used cream colors. Both will work. If you want to invest a little bit of money in this, you can even buy alcohol activated paint, which is much more expensive. You will need a rage of reds, some purples and bruise colors and a black color. Use the reds and black inside the wound and the purples and bruise colors around the wound. Also place some red on the outside of the wound.
For the glass I crushed a CD case, if you have acrylic, you can also use that. Glue it inside of the wound with liquid latex.


For the blood you can find fake blood in all Halloween stores or you can make your own. There's a couple of different recipes. I personally prefer to mix food coloring in neutral gelatin. I mix some red and some blue until I achieve the shade I want. Add more red to make fresh arterial blood or add less red a bit more of blue to achieve venous or dry blood shades.
You can apply it with a straw and use a tooth brush to splatter it all over.

This is pretty simple to achieve if you have the notion of what glass stuck to the skin would look in real life.
To create all looks with FX makeup, you will want to analyse a couple of different images of real life situations that portrait what you want to mimic. That could be the worse part for some.


To finish off my look, I did some pin curls in my hair and then molded them to the shape I wanted, to get the final pin up look.

The look wouldn't be complete without a pin up dress and some Mary Jane pumps.


If you want and can afford, you can purchase white contacts to emphasize that dead look.

 I hope you have enjoyed this post and this look, good luck if you try to do it on yourself!

 Love,
Anna