Hi! First and foremost I want to, again, apologize for not posting. My exams ended on Tuesday and I was going to do this post on Tuesday but I was exhausted so I figured I'd take some times to rest.
So today I bring you this FOTD post in which, as usual, I take the two most recent photos of my Instagram and tell you all the products I used to achieve the look.
Now, in both these posts you can realize my hair colour has changed, I will be making and "in depth" post about that very soon, hopefully the next one, and explain you all about that story.
Let's get to the looks!
Before I get to the actual products I want to address this: W7 is a company that makes really good dupe palettes of some more expensive and I used one called Neon Nights which is a dupe for Urban Decay's Electric Palette so any reference to eyeshadows from this palette will be made as "dupe of .... from the Electric Palette" because this palette doesn't have names for their eyeshadows.
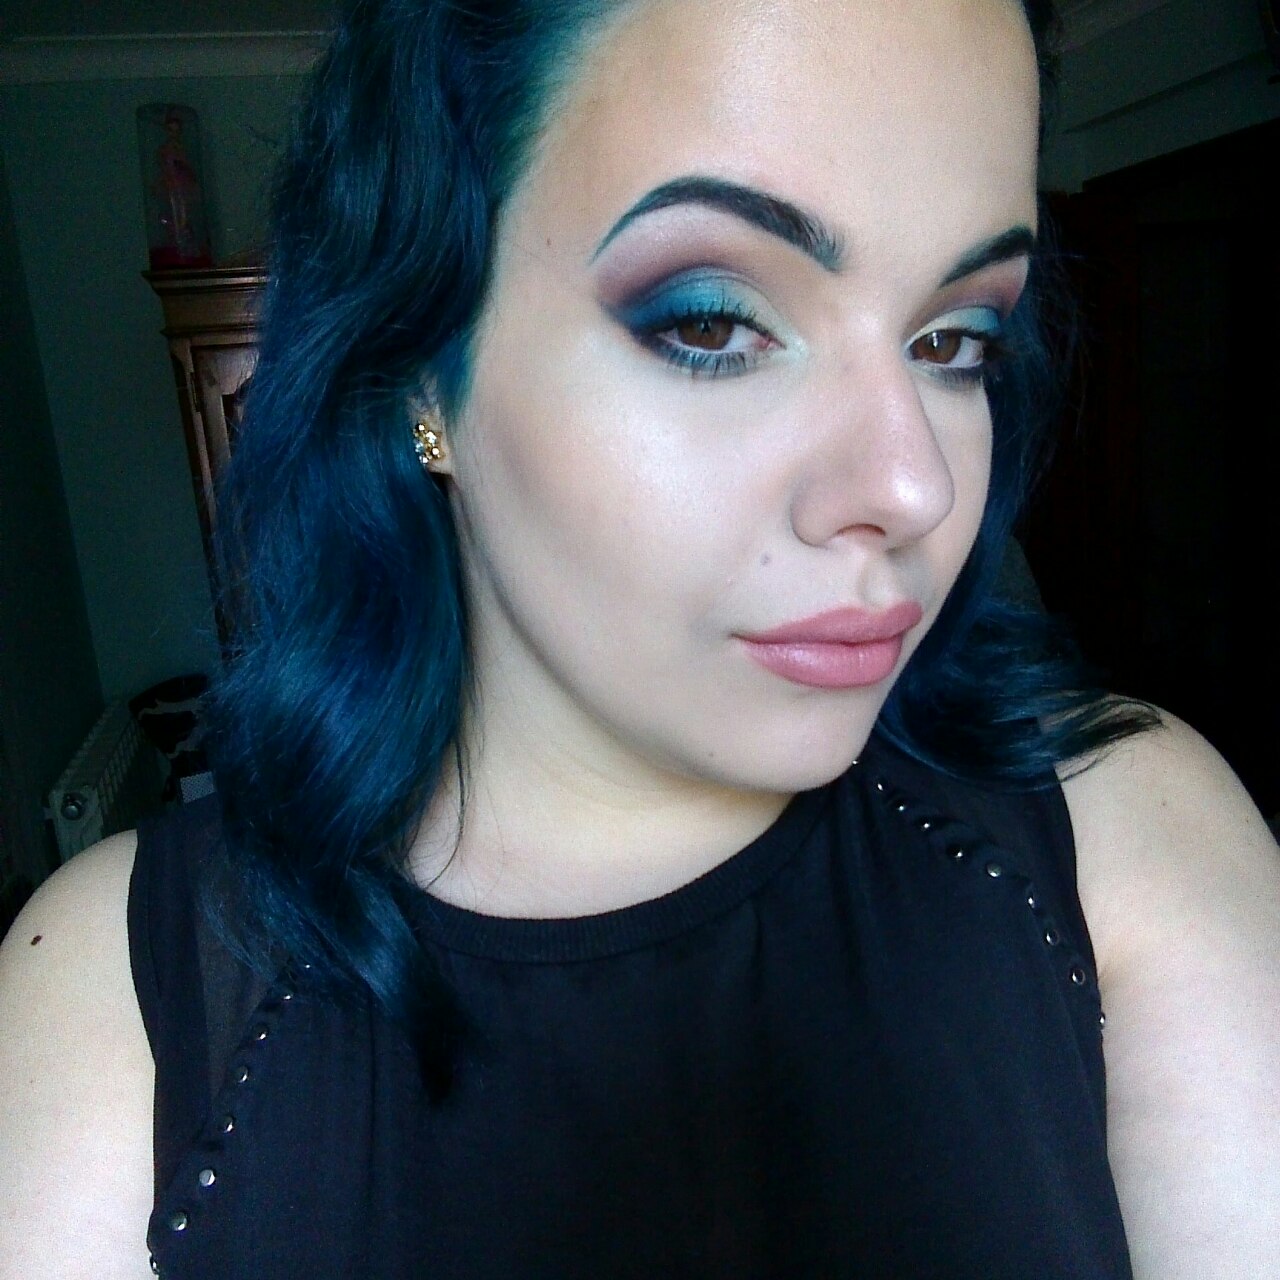
Face:
Essence Stay Natural Concealer in 03 Soft Nude and 04 Soft Honey
W7 In The Mood Eyeshadow Palette in Wink (contour)
H&M Highlighting Palette in 2
H&M Bronzing Powder in Gorgeous Tan
Eyes:
Essence I Love Stage Eyeshadow Primer
W7 Neon Nights Eyeshadows dupe for Fringe from the Electric Palette
Sleek Ultra Mattes V2 Eyeshadows in Orbit, Ink, Noir, Dune, Flesh, Pillow Talk and Villan
Essence Holographic Effect Eyeshadows in 73 Mint Candy
Maybelline Colossal Go Extreme Mascara
Brows:
Sleek Ultra Mattes V2 Eyeshadows in Orbit
Essence Lash & Brow Gel Mascara
Lips:
Essence Stay Matt Lip Cream in 03 Soft Nude
Face:
Benefit Boi-ing Concealer in O1 and O2
Benefit Hello Flawless Powder Foundation in "I love me" Ivory
Essence Stay Natural Concealer in 03 Soft Nude and 04 Soft Honey
H&M Highlighting Palette in 1 and 2
H&M Bronzing Powder in Gorgeous Tan
Eyes:
Essence I Love Stage Eyeshadow Primer
Sleek Au Naturel Eyeshadows in Conker, Noir
Sleek Ultra Mattes V2 Eyeshadows in Villan, Maple, Flesh and Noir
W7 Neon Nights Eyeshadows dupe for Jilted from the Electric Palette
Essence Liquid Ink Eyeliner in Black
Maybelline Colossal Go Extreme Mascara
Adell Lashes in 118
Brows:
H&M Eyebrow Kit in Blonde, Brown and Black
Essence Lash & Brow Gel Mascara
Lips:
MAC Lip Liner in Nightmoth
Avon Ultra Colour Lipstick in Vixen
And that's it for this post! I hope you liked it and I will be back soon to show you my hair transformation!
Love,
Anna
Showing posts with label makeup look. Show all posts
Friday, July 10, 2015
Saturday, March 28, 2015
Modern Smokey Eye Look for Hooded Lids
Hi, today
I’ll be guiding you through how I created the smokey eye for hooded eyes I
showed you in the previous post. This is how I created this specific smokey eye
look for Rita’s eye shape.
Let’s get started!
Let’s get started!
An
extremely important step for any makeup really is to prime. This is a specially
important step for people with hooded eye lids. Since they are hooded, the
makeup will most likely move around and transfer to the other lid. If you prime
the eyes, you’ll find that it won’t move as much and will stay put longer than
if you weren’t to use an eye primer.
Since I
decided to go for a black smokey look, I put down a cream base in a V shape on
the outermost part of the lid. This is the place where most of the black will
be focused on so this base will help giving it depth. You can use a cream
shadow or even gel eyeliner like I did.
Before it
dried, I blended the gel eyeliner with a pencil brush. I used a pencil brush
mostly because I wanted to blend the edges and keep the V shape very black
still.You want to blend it but not too much so it won’t interfere with the rest
of the lid. You want to keep that part blank.
To further
darken the V shape, I used a black eyeshadow.
You
obviously want to blend that black eyeshadow out, it’s a smokey eye.
Blend the black eyeshadow out up to the brow bone, leaving no harsh lines of black there. You do not need to blend the eyeshadow in into the lid because you will be placing another colour there anyway that will be covering that blending job you did, so it’s useless.
After
you have placed the black and blended it, it is time to fill in that lid that
we had left blank. I decided to use a light silver pigment, it is up to you
what you use in this step. I applied it all over the lid that still didn’t have
any eyeshadow on and also on the inner corner of the eye.
If you
desire you can go back in and place some more black on the outer V you created
previously and also place some more pigment if it seems to be overwhelmingly black.
At this stage you want to perfect what you have already created, blend more,
apply more, perfect it.
Moving onto
the lower lash line, I also used some of that black eyeshadow on the outer
third of the eye and applied silver pigment on the rest of the lower lid.
To finish
it I used black gel eyeliner and liner the top lash line and the water line, as
well as applied some mascara onto Rita’s lashes to further blacken the eye
look.
And you’re
supposed to have something that looks like the photos above.
I hope you
have enjoyed this post.
Quick fun
trivia: This post was written on the plane to London.
I will be doing a post about London in the future, just not sure if it will be the next one or the one after that.
This is it
for this week’s post.
If I don’t post before that, have a great Easter and, if you’re on Spring break, have a fantastic one.
Love,
Anna
Tuesday, March 24, 2015
FOTD: Black No. 1
This post is a celebration of my new Tumblr URL (thanks Rita!). Black No. 1 (Little Miss Scare-All) is the title of a song by Type O Negative, one of my favorite bands. The song's a very tounge-in-cheek look at the 'gothic girl' stereotype and black #1 is the most common name for true black hair dye. As someone who's been continuosly pointed as a Black No. 1 type (without the black hair I guess) I don't find it offensive; I don't take myself too seriously, but people who do either take this song as their anthem or as an insult,completly ignoring how sarcastic it is.
But for this look I was trying to do something very goth, but more in the early 90s or traditional 80s goth range. So I did a dramatic black and white semi-cut crease and black and red lips. For the eyes I only used my Sleek Au Naturel palette and on the lips a combination of black eyeliner and two shades red lipstick. I used no reference picture because I used to do this look pretty much everyday last year.
I hope you enjoyed this post!
Until next time!
Until next time!
LOTS OF LOVE,
Tânia
Sunday, March 22, 2015
One look, five eye shapes
Hi! Today I'm here with a post that I'm particularly excited about. This is because I've wanted to do this kind of post forever.
In this post I'll be showing you how one specific eye look differs from eye shape to eye shape.
This is important because most people watch videos on youtube and think "oh this is a pretty look, I shall try!" and then it looks nothing like it did on the video. This happens obviously because everyone has different eye shapes. It's obviously not because you're not a professional makeup artist, even if you follow the steps presented it will most likely turn out different, or you'll have trouble finding the places where to place this or that color.
I, by no means, am trying to say that I am a makeup artist, I've previously mentioned how I'm still learning and all that, I just thought this would be interesting,
I gathered a couple of friends and offered to do their makeup, I used the same techniques to all eye shapes, the same brushes, the same eyeshadows, all the same products and yet you'll see they look completely different from each other.
Let's get to it!
I did a modern smokey eye where I used black on the outer v of the eye and silver pigment on the rest of the lid and into the inner corner. This is how it looks on my eye. Although it looks like I have hooded eyes, I do not, as you may have realized from previous posts. I have pretty standard eyes, the crease is just a bit folded in sometimes.
As you can see, when my eye is open, most of the colors I placed on the lid are visible and the silver stands out from the black, elongating the eye a bit.
This is how the same makeup looks on Catarina, a regular presence here on the blog.
Her eyes are a bit more round than mine or Tamara's and her eye is a lot more hooded than ours, although still being a very standard eye shape.
The shades placed on the lid are still visible but her eye looks a lot more sad because of that black eyeshadow I placed on the lower lid.
Mariana has very very hooded eyes. When she looks straight at you, you cannot see not a bit of her mobile lid, just a bit of the lash line.
As you can see on the top photo, when her eyes are open, it seems like she only has black eyeliner on the top lid and a bit of black smudged on the lower lash line.
The silver on the inner corner also doesn't stand out as much as it does on any of the other shapes I presented you.
In next week's post I will be showing a step by step on how to create this exact look for hooded eyes, not Mariana's but Rita's.
I hope this post has helped you understand how much makeup differs from eye to eye according to its shape.
I loved doing this post and doing makeup for the girls and all, it was a lot of fun!
I hope you have enjoyed this post and I'll be back next week with another one!
Love,
Anna
In this post I'll be showing you how one specific eye look differs from eye shape to eye shape.
This is important because most people watch videos on youtube and think "oh this is a pretty look, I shall try!" and then it looks nothing like it did on the video. This happens obviously because everyone has different eye shapes. It's obviously not because you're not a professional makeup artist, even if you follow the steps presented it will most likely turn out different, or you'll have trouble finding the places where to place this or that color.
I, by no means, am trying to say that I am a makeup artist, I've previously mentioned how I'm still learning and all that, I just thought this would be interesting,
I gathered a couple of friends and offered to do their makeup, I used the same techniques to all eye shapes, the same brushes, the same eyeshadows, all the same products and yet you'll see they look completely different from each other.
Let's get to it!
I did a modern smokey eye where I used black on the outer v of the eye and silver pigment on the rest of the lid and into the inner corner. This is how it looks on my eye. Although it looks like I have hooded eyes, I do not, as you may have realized from previous posts. I have pretty standard eyes, the crease is just a bit folded in sometimes.
As you can see, when my eye is open, most of the colors I placed on the lid are visible and the silver stands out from the black, elongating the eye a bit.
Here you can see the exact same makeup done on my friend Tamara. Her eyes have a very interesting shape and I always get so excited when she asks me to do her makeup because it's such an unusual eye shape from all others I've done makeup on!
Her eyes are ever so slightly hooded, not too too much, just a tiny bit. You can see that her mobile lid folds under the socket of her eyes a tiny bit but the silver and the black are still visible.
As you can see, it looks absolutely different on her from how it looked on me.
Her eyes are a bit more round than mine or Tamara's and her eye is a lot more hooded than ours, although still being a very standard eye shape.
The shades placed on the lid are still visible but her eye looks a lot more sad because of that black eyeshadow I placed on the lower lid.
Here you can see Rita's eyes. I have the privilege to do her makeup quite often because she's my girlfriend after all, so I have kind of gotten a bit more of practice with hooded eyes like hers.
Her eyes are very hooded and very long. They're small but they have an almond shape, making them look rather long and not wide.
On her eyes, the same makeup looks completely different. You cannot see the shades on the lid because the mobile lid is being "swallowed" into the socket, making it almost disappear, so you can only see the black from the crease and the black eyeliner. It almost looks as if the silver wasn't even there.
As you can see on the top photo, when her eyes are open, it seems like she only has black eyeliner on the top lid and a bit of black smudged on the lower lash line.
The silver on the inner corner also doesn't stand out as much as it does on any of the other shapes I presented you.
In next week's post I will be showing a step by step on how to create this exact look for hooded eyes, not Mariana's but Rita's.
I hope this post has helped you understand how much makeup differs from eye to eye according to its shape.
I loved doing this post and doing makeup for the girls and all, it was a lot of fun!
I hope you have enjoyed this post and I'll be back next week with another one!
Love,
Anna
Saturday, February 28, 2015
Golden Spring
Hello! Today I bring you a Spring inspired look. This is a colorful look that will certainly not be "something" for everyone but it's fun and you can always tone it down, use some neutrals to make it more wearable to suit your daily activities.
Let's get started!
Let's get started!
I came up with the idea for this look after I saw Oriflame's spring campaign. They have this girl with gold and purple shades in her eyes and it looked delightful! It was so pretty that I decided to try it out.
I had no idea purple and gold would go so well together!
This look can be toned down by using colder shades of purple rather than warmer, as I did for this post.
The warmer the purple you use, the stronger that sunset feel will be. When blended into the gold, the purple can mix up with the yellow tones of the gold and create a beautiful gradient.
Any type of purple will suit this makeup really, you just have to find out what kind of purple suits your complexion better.
Usually warmer purples go better with yellow/golden/olive skin undertones and cooler purples will be best for pink skin undertones because they will complement the skin better.
I used only two pigment to achieve the gold and purple gradient. Unfortunately I only have the littlest bit of these two pigments so I store them in tiny Z bags and I did not identify them so I can't identify them for you with accuracy. Instead, I'll be presenting alternatives that will help you achieve this same look.
I used a light gold pigment, that is very reflective, on the inner half of my eye. Some alternatives for this would be Makeup Geek's New Year's Eve or Sweet Dreams pigment for lighter skin colors and Makeup Geek's Afterglow pigment for darker, warmer skin colors. The pigment I used if very very similar to New Year's Eve and it is best for pale skin tones. If you have a medium skin tone, Sweet Dreams is a great option and Afterglow is best for darker skin tones. If you're not a fan of pigments, Makeup Geek's Shimma Shimma eyeshadow, for light skin tones, and Makeup Geek's In the Spot Light foiled eyeshadow, for deeper skin tones, are also great options.
I used a very warm purple pigment on the other half of my eye, the pigment that I used has no shimmer to it so I think you'd achieve the same effect with an eyeshadow. A couple of options to this are Sugarpill's Poison Plum eyeshadow and Sugarpill's 2AM eyeshadow. Poison Plum is a darker version of 2AM, both are very warm purples tho. I would say that the pigment I used is similar to 2AM because it is lighter and a more vibrant shade of warm purple. If you want to darken up the outside corner of the eye, Poison Plum is a great option. But, if you're going for a darker look, Poison Plum is purfect too.
Both these eyeshadows are matte and shimmer-less.
I blended the gold and the purple together, achieving this sunset'ish effect. I had to darken my lashline, and for that I used black eyeshadow and I buffed it out to soften it. I also used a light beige pencil liner on the inner half of my waterline and black eyeliner on the outer part of my waterline. This gives a more elongated shape to my eye, brightening up that inner corner.
If you want a more dramatic look, go for black in all of your waterline.
Top it up with some mascara and the eye is finished!
I decided to bronze up the face a little, after contouring, and I used a pink blush that will match the eye makeup a little. I used highlighter in the highest points of my face to enhance that glow as well.
For lips I used a lipliner in a brownish color a tad darker than my skin color. A good pencil for this would be OCC'S Cosmetic Colorful Pencil in Pennyroyal for lighter skin tones and OCC'S Cosmetic Colorful Pencil in Sybil for darker skin tones.
I used this to outline my lips. Then I used O Boticário's lipgloss in 223 (which is a great dupe for Nars' Orgasm Lipgloss) all over the lips and I used a little bit of that gold pigment I had used before in the center of the lips.
This combo gives me a fuller pout that looks effortlessly natural.
And that's it for this week's post! I hope you have enjoyed this spring look. I find that these colors are perfect for spring since they're so colorful!
Tânia told me the other day that one of the girls from her class did a frame inspired in my Valentine's Day DIY frame that I did in January and she showed me the final result and I loved it!
I love to know that someone out there that sees our blog gets inspired by what me and Tânia do, so if you recreate any of our looks or get inspired by our posts, please let us know! We'd love to receive your feedback!
I hope you have a wonderful week and I'll be back in the next one.
Love,
Anna
Sunday, February 22, 2015
Cristina Scabbia Inspired Makeup Look
Hi! Today I bring you a slightly different post. Tânia did something similar to this close to the holiday season where she posted a photo from her Instagram page and identified all the products she used under in the post. This post will be something like that.
This look is inspired by Cristina Scabbia and I posted a photo of this makeup on my Instagram page, which is now private due to my sister that has been stalking me lately, so sweet of her. But anyway, this look is a recreation of that dark smokey eye Cristina loves to wear so much and the red lips that she also seems to love.
She usually goes for a full on black "panda" eye but I find that that look doesn't suit most eye shapes so I decided to highlight the inner corners instead of doing them black as well like she does.
This look is inspired by Cristina Scabbia and I posted a photo of this makeup on my Instagram page, which is now private due to my sister that has been stalking me lately, so sweet of her. But anyway, this look is a recreation of that dark smokey eye Cristina loves to wear so much and the red lips that she also seems to love.
She usually goes for a full on black "panda" eye but I find that that look doesn't suit most eye shapes so I decided to highlight the inner corners instead of doing them black as well like she does.
Eyes:
Essence I Love Stage Eyeshadow Primer
Avon SuperSHOCK Gel Eyeliner Pencil in Black
Avon True Color Eyeshadow in Blackest Black
Catrice Absolute Eye Colour Mono Eyeshadow in 660 Ice White Open
H&M Gel Eyeliner
Avon Mega Effects Mascara in Blackest Black
Brows:
Essence Eyebrow Designer in 02 Brown
Essence Lash & Brow Gel Mascara
Essence Big Bright Eyes Jumbo Pencil in 01 Nude
Face:
Catrice Prime & Fine Face Primer
Garnier Oil Free BB Cream in Light
Catrice Camouflage Cream Concealer in 020 Light Beige
Catrice Nude Illusion Loose Powder
H&M Bronzing Powder in Gorgeous Tan
Lips:
Essence Lip Liner in 13 Transparent
Rimmel Lasting Finish By Kate Moss Lipstick in 01
I hope you enjoyed this slightly different post.
I got very inspired by Tânia's post and I'm thinking about doing something similar next and I'll probably post it on tuesday or wednesday since I have some free time after my Portuguese test (Fernando Pessoa is killing me). I've been posting more than usual..
Anyway, I hope you have a lovely weekend.
Love,
Anna
Saturday, January 24, 2015
Cloud Nine
Hello! This week I bring you the first look from the Elements series of looks.
This look was inspired by the element Air and all the magical creatures that live in it such as fairies and angels.
I have named this look after Evanescence's song Cloud Nine. It was pretty hard to find a title for this look that pleased me but this title was suggest by Rita and it feels appropriate. Cloud Nine reminds me of soft purple colors. Don't judge me.
I used some pastel eyeshadows such as a minty green, a warm purple, a purplish pink, blue and lavender because, again, this gives me the idea of lightness, softness and pureness.
The glitter in my inner corner and lips as well as the sparkle on my eyebrows and cheeks are a representation of the magical creatures that make the air their homes, the fairies.
The white feathers area symbol of angels and doves and all sorts of creatures that are as pure as air itself and that can fly.
This look was inspired by the element Air and all the magical creatures that live in it such as fairies and angels.
I have named this look after Evanescence's song Cloud Nine. It was pretty hard to find a title for this look that pleased me but this title was suggest by Rita and it feels appropriate. Cloud Nine reminds me of soft purple colors. Don't judge me.
I used a lot of pastels and light colors for this look because that's what came to my mind when thinking of the element Air.
I'm not going to go into too much detail with the makeup itself, I rather am going to explain why I did it this way, also because it's a pretty basic makeup look.
I used some pastel eyeshadows such as a minty green, a warm purple, a purplish pink, blue and lavender because, again, this gives me the idea of lightness, softness and pureness.
The glitter in my inner corner and lips as well as the sparkle on my eyebrows and cheeks are a representation of the magical creatures that make the air their homes, the fairies.
The white feathers area symbol of angels and doves and all sorts of creatures that are as pure as air itself and that can fly.
For that pink sheen on my eyebrows I used Essence's metallic eyeliner in Rosy Rush, just ran the brush very lightly over the hairs and left them very light and simple.
For lips I used Avon's Power Plum lipstick and some light pink glitter on the cupid's bow.
To create pastel looks like this one I would highly recommend Sugarpill's Sparkle Baby palette that has some very soft pastel colors.
This is it for this week's post, I hope you have enjoyed this first look of the Elements series.
Next week I probably won't be posting a look because I'm gonna have a busy week in school. But I'm looking forward for a new Elements look!
Love,
Anna
Sunday, January 18, 2015
Ice Queen
Hello!
First of all I would like to apologize for the lack of posts this week. I was supposed to post on friday but I had absolutely no time, then it was delayed to saturday but I had to do some house cleaning and when I was done I was too tired to edit photos. So I'm sorry for the late post.
Also, Tânia didn't post this week because she had made one more post than me during the holidays so we decided that she wouldn't do one this week.
The good news are that we have a little surprise prepared for you! The following four weeks I will be doing a series of makeup looks inspired by the four elements, water, fire, earth and air.
The looks will be named after metal songs of our choice, according to the element.
We haven't yet decided if it will be done by both of us or not but I will update you on that soon.
So this week's post is a little introduction to that series.
I'm aware that ice is not an element but it is made out of one of those elements and I thought it would be fun.
I want to warn you from the beginning that the photography quality is quite poor in these photos because we were having a problem with the lighting. We use the natural light and I took a little while longer to finish this look, so when the photos were taken there was almost no light. I hope you understand.
I used a dark blue shade to contour my face and a more royal blue color to serve as blush.
First of all I would like to apologize for the lack of posts this week. I was supposed to post on friday but I had absolutely no time, then it was delayed to saturday but I had to do some house cleaning and when I was done I was too tired to edit photos. So I'm sorry for the late post.
Also, Tânia didn't post this week because she had made one more post than me during the holidays so we decided that she wouldn't do one this week.
The good news are that we have a little surprise prepared for you! The following four weeks I will be doing a series of makeup looks inspired by the four elements, water, fire, earth and air.
The looks will be named after metal songs of our choice, according to the element.
We haven't yet decided if it will be done by both of us or not but I will update you on that soon.
So this week's post is a little introduction to that series.
I'm aware that ice is not an element but it is made out of one of those elements and I thought it would be fun.
This week's look is an Ice Queen look. This look was named after Within Temptation's Ice Queen and is not at all inspired in the makeup that Sharon uses in the video for this song.
I was inspired by one of last year's trends and also by a look that I've seen a lot on Instagram.
The eye makeup is very simple. I used a white eyeshadow all over my lid up to my brow bone as my base color and also as a blending shade. Then I moved to the lower lid and used a dark blue eyeshadow, I packed it on quite heavily and then used a blending brush to feather it out creating this reverse cat eye, very popular among Instagram beauty gurus lately. To connect this reverse cat eye to the top lid I used a bit of that same dark blue and simply connected it to my lash line, creating a triangle. Blending was the key in this look, I blended as much as I possibly could to make it soft and simple.
The dot eyeliner was a massive trend last year and I thought it went perfectly with the theme, so I went for it. I chose white to simulate snow and simply dotted along a low cat eye.
Popped some eyeliner on my water line and black mascara on top lashes and on my bottom lashes, although it may not be so visible, I used white mascara and believe me, in real life it did stand out from that dark blue underneath.
If you are questioning yourself about what's going on in my lower lid, the thing is, I have a natural wrinkle in that place and I used a bad base on my lower lid that made the makeup in that area wrinkle. I apologize for that.
On my eyebrows I used a dark blue eyeshadow that looks mostly black on photos.
For the lips I went black and over that I placed a metallic blue pigment that was in the same cold vibe as the eyes.
For contouring and highlighting I used a drag queen technique. The baking technique.
I basically did my foundation in white and then layered white powder on the high points of the face like under the eyes and top of the cheeks. I let that "bake" while I did my eye makeup and then buffed it out, leaving those point of the face much more lifted.I used a dark blue shade to contour my face and a more royal blue color to serve as blush.
On my cheekbones, chin and forehead I drew some snowflakes with white creamy face paint and then dusted a bit of a reflective pigment over top to create a different way of highlighting the face.
I have loads of beauty marks and such on my face so I decided to cover them with a white metallic eyeliner so that they would look like snow. Sort of how I would picture an Ice Queen's beauty marks to be.
And that's it! That's how I achieved this look, pretty simple, yet different due to the dot eyeliner.
I hope you have enjoyed and I will be back with some elements inspired look next week!
Love,
Anna
Monday, December 29, 2014
New Year's Eve Makeup Look
Hello! Since I missed on the christmas makeup look, I decided that I would do a New Year's Eve makeup for you. New year's eve is such a fun time to play with makeup! You're entering a new year, you can use and abuse the glitter, the sparkle, the shine and the metallic shadows, it's a celebration time and nothing better than makeup to show how excited you are for the new year that is ahead of you.
So I did this look inspired in Simone Simons' stage makeup for Epica's Utrecht show with loads of glitter and sparkle! I was scrolling down her Instagram to find a photo that she has with Fernando from Moonspell and came across this beautiful makeup that looks so festive. I instantly got a boom of inspiration and decided that today I would do this look for the post.
My version of it turned out a lot less dark but still very sparkly, I hope you enjoy it.
So I did this look inspired in Simone Simons' stage makeup for Epica's Utrecht show with loads of glitter and sparkle! I was scrolling down her Instagram to find a photo that she has with Fernando from Moonspell and came across this beautiful makeup that looks so festive. I instantly got a boom of inspiration and decided that today I would do this look for the post.
My version of it turned out a lot less dark but still very sparkly, I hope you enjoy it.
In Simone's Instagram photo, her eyeshadow looked pretty metallic and in a grayish blue shade. That's what I tried to mimic with this metallic teal eyeshadow that reflects gold in certain lights. Most of the eyeshadows I used are from this new palette I was given for christmas that I will show in a future post in my christmas haul.
I used this color all over my lid till the crease. In the crease I used first a matte shade a couple of shades darker than my natural skin tone as a blending color. Then I placed black in the outer V, creating a cat eye effect, just like Simone had. I blended it all out with a fluffy brush I got as christmas present, which I will also show you in a future post. On the lower lid I used black on the outer corner, connecting it to the top lid and some of that teal shade along the inner third of the lower lash line. In the inner corner of my eye I used yet another eyeshadow from that palette that is very shimmery and that highlights the eye quite a lot.
Now for the fun part, the glitter!
Simone had loads of sparkle going on and that's what I tried to do too by using gold glitter. Glitter tends to fall out a lot if it doesn't have a base to stick to. If, like me, you don't have a glitter base, here's a tip: take your clear eyebrow gel, rub your ring finger in the wand and use that gel very lightly all over the lid. While it's still wet place the glitter on top. It will stick to it like no other.
I used a gel eyeliner to line the eye. I did a line a little more dramatic than usual for this one.
I also used that same gel liner on my water line, to give the eye a bit more of depth and drama.
You can't skip lashes with this look and that's why I used quite dramatic ones from Ardell in 131 Black.
I also filled in my brows with H&M Dark Brown eyebrow pencil and used a clear brow gel to keep them in place.
I don't use foundation. I have created some sort of aversion to foundation, I hate the feeling of liquid foundation. I just don't use it in general. I only used some moisturizing cream and concealer in my problem areas and to highlight under the eyes.
I then set all of that with a translucent powder and move on to face sculpting.
Try to go with your natural shape, only enhancing it a little bit. That's what I did by placing a little bit of bronzer on my cheeks to define them and just a dash on my temples. I then went to a pinkish blush similar to Nars' Orgasm and highlighted the tops of my cheekbones, nose, chin and cupid's bow.
For the lips I used a lipstick that is the exact same shade as my natural lip color.
Simone had a peachy pink color on that seemed very glossy and quite a big outline on those lips, but I decided to leave it a bit more subtle there.
And that's the look complete! I'm not gonna do this one on myself but I've already got requests to do it on someone else. This year I've decided not to use glitter on myself.
I want to make a little note here and say that most of the photos for this look have zero to no edition. All credits to the amazing Catarina from the blog D'une Lune and a huge thank you to this girl for the spectacular job she did today.
This is it for this week's post! I hope you have liked it and gotten inspired for some new year's looks.
I will be back this weekend with a christmas haul with all the goodies I got for christmas.
Love,
Anna
Subscribe to:
Posts (Atom)


